之前总结了一篇关于win的终端优化,但是实际上我99%的开发环境还是mac/linux,所以这里也共享下我的相关终端环境配置
terminal
iterm2 / guake
mac推荐使用iterm2, linux下推荐使用guake,都相当酷炫好于自带terminal
字体
- 下载地址:powerline
- 进入到项目目录,执行./install.sh指令安装所有Powerline字体
- 配置字体 (自带terminal同理)
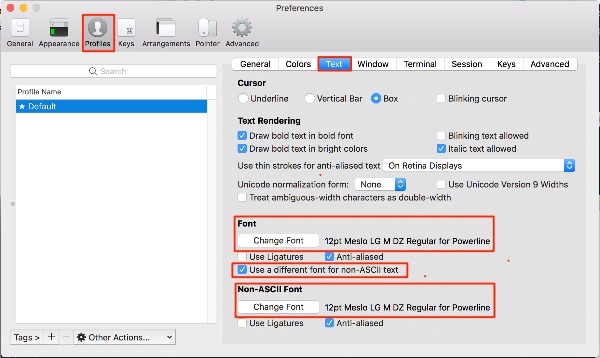
配色
-
下载地址: iterm2 osx原生terminal
-
进入刚刚下载的工程的solarized/iterm2-colors-solarized 下双击 Solarized Dark.itermcolors 和 Solarized Light.itermcolors 两个文件就可以把配置文件导入到 iTerm2 里,然后如下图设置配色方案(自带terminal同理)
Homebrew / apt-get
包管理工具就不多介绍了,直接放上安装command
# install xcode
xcode-select --install
# homebrewterminal
/usr/bin/ruby -e "$(curl -fsSL https://raw.githubusercontent.com/Homebrew/install/master/install)"
zsh
zsh 安装
- 查看系统自带哪些shell
cat /etc/shells- 安装zsh
apt install zsh # CentOS
brew install zsh # mac安装- 切换默认shell
chsh -s /bin/zshNotice:如果重新打开terminal默认shell没有切换成zsh请根据自己系统自行查阅下如何切换默认shell
oh-my-zsh 安装
sh -c "$(curl -fsSL https://raw.githubusercontent.com/robbyrussell/oh-my-zsh/master/tools/install.sh)"config
具体设置内容我就不一一翻译了,看comments就很容易理解,相关文章也不胜枚举了,我直接在这里po上我的zshrc文件 mac参考zshrc-mac linux参考zshrc-linux
plugins
推荐zsh-syntax-highlighting和zsh-autosuggestions这两个插件,安装方法如下
# mac

brew install zsh-syntax-highlighting
brew install zsh-autosuggestions

# linux

sudo apt-get install zsh-syntax-highlighting
git clone https://github.com/zsh-users/zsh-autosuggestions ${ZSH_CUSTOM:-~/.oh-my-zsh/custom}/plugins/zsh-autosuggestions

# add to zshrc
echo "source /opt/homebrew/share/zsh-syntax-highlighting/zsh-syntax-highlighting.zsh" >> ~/.zshrc
echo "source /opt/homebrew/share/zsh-autosuggestions/zsh-autosuggestions.zsh" >> ~/.zshrc